The E6B flight computer has been a staple in pilot flight bags since the 1930s. It looks intimidating the first time you pick one up, but once you understand the logic behind it, you’ll realize it’s really just a circular slide rule designed to handle a handful of specific aviation problems.
This guide walks through every major E6B function with concrete, worked examples. By the end you’ll be able to sit down with an E6B and your chart and fill out a complete nav log without reaching for a calculator.
What Is an E6B?
The E6B is a two-sided mechanical calculator. Each side solves a different category of problem:
- Front (Calculator Side): Speed, distance, time, fuel burn, true airspeed, density altitude, and unit conversions
- Back (Wind Side): Wind correction angle and groundspeed
The front works like a circular slide rule, two concentric rings you rotate against each other. The back has a sliding card beneath a rotating compass rose disc.
Most E6Bs also have a small window on the calculator side for temperature-based calculations like true airspeed and density altitude.
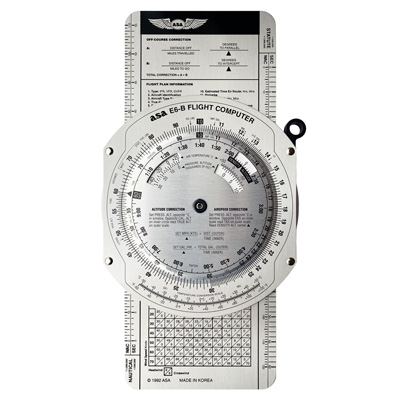
ASA E6-B Aluminum Flight Computer
The classic aluminum E6B. Durable enough to last through your entire training and well beyond. Includes a wind component grid and comprehensive conversion scales.
The Calculator Side: Speed, Distance, and Time
The most fundamental E6B skill is solving the speed-distance-time triangle. The formula is:
Distance = Speed × Time
Or rearranged: Speed = Distance ÷ Time, and Time = Distance ÷ Speed.
The calculator side handles all three variations by letting you set two known values and read the third.
Understanding the Scales
The outer ring represents distance (or any quantity measured per unit of time — like gallons of fuel). The inner ring represents time, with a special index mark labeled “60” or “SPEED” at the top. This index represents one hour (60 minutes), and it’s the key to all calculator-side problems.
Worked Example 1: Finding Time En Route
Problem: Your groundspeed is 115 knots. Your destination is 138 nautical miles away. How long will the flight take?
Steps:
- Find 115 on the inner ring (your speed)
- Rotate the rings so 115 on the inner ring aligns with 60 (the speed index) on the outer ring
- Now find 138 on the outer ring (your distance)
- Read the number directly below it on the inner ring: 72 minutes (1 hour 12 minutes)
Check your work: 115 knots × 1.2 hours = 138 nautical miles. ✓
Worked Example 2: Finding Groundspeed
Problem: You flew 85 nautical miles in 48 minutes. What was your groundspeed?
Steps:
- Set 85 on the outer ring opposite 48 on the inner ring
- Look at the number on the outer ring that lines up with the 60 index on the inner ring
- Read 106 knots
Check: 85 NM ÷ 48 min × 60 = 106.25 knots ✓
Worked Example 3: Finding Distance
Problem: You’re cruising at 132 knots for 2 hours 15 minutes. How far will you travel?
Steps:
- Convert 2 hours 15 minutes to 135 minutes
- Set 132 on the inner ring opposite the 60 index on the outer ring
- Find 135 on the inner ring
- Read the number above it on the outer ring: 297 nautical miles
Fuel Burn Calculations
Fuel problems use the exact same technique as speed-distance-time. The only change is what each number represents:
- Speed (knots) → Fuel burn rate (gallons per hour)
- Distance (NM) → Total fuel (gallons)
- Time (minutes) → Time (minutes)
Worked Example 4: Total Fuel Required
Problem: Your Cessna 172 burns 8.5 gallons per hour at cruise. Your flight will take 2 hours 20 minutes. How many gallons do you need?
Steps:
- Convert 2 hours 20 minutes to 140 minutes
- Set 8.5 on the inner ring opposite the 60 index on the outer ring
- Find 140 on the inner ring
- Read the number above it on the outer ring: 19.8 gallons
Add your reserves (FAA requires 30 minutes VFR day) and you have your fuel requirement.
Worked Example 5: Fuel Remaining
Problem: You departed with 40 gallons usable. You’ve been flying for 1 hour 45 minutes at 9.2 GPH. How much fuel remains?
Steps:
- First find fuel burned: Set 9.2 opposite 60
- Find 105 minutes on the inner ring
- Read fuel burned: 16.1 gallons
- Subtract: 40 − 16.1 = 23.9 gallons remaining
True Airspeed and Density Altitude
The small window on the calculator side is used for temperature-dependent calculations. It’s labeled with Pressure Altitude on one scale and Temperature (°C) on the other.
Worked Example 6: True Airspeed (TAS)
Your airspeed indicator shows Indicated Airspeed (IAS), but the air gets thinner as you climb. Your actual speed through the air — True Airspeed — is always higher than indicated at altitude.
Problem: You’re cruising at 8,500 feet pressure altitude. Outside air temperature is -5°C. Your indicated airspeed is 120 knots. What is your true airspeed?
Steps:
- Locate the TAS/Density Altitude window on the calculator side
- Rotate the inner ring until -5°C (temperature) aligns with 8,500 feet (pressure altitude) in the window
- The arrow in the window now points to your density altitude: approximately 8,200 feet
- On the main scales, find 120 on the inner ring (your IAS)
- Read the number above it on the outer ring: 134 knots TAS
Rule of thumb: TAS increases roughly 2% per 1,000 feet above sea level. At 8,500 feet, expect TAS to be about 17% higher than IAS — close to the 134 knots we calculated.
Worked Example 7: Density Altitude
Density altitude is critical for takeoff performance calculations. High density altitude = longer takeoff roll, reduced climb rate.
Problem: It’s a hot summer day. Field elevation is 5,200 feet MSL. The altimeter setting is 29.65” Hg. Temperature is 32°C (90°F). What is your density altitude?
Step 1 — Find pressure altitude: Pressure altitude = Field elevation + (29.92 − altimeter setting) × 1,000 = 5,200 + (29.92 − 29.65) × 1,000 = 5,200 + 270 = 5,470 feet pressure altitude
Step 2 — Use the E6B window:
- Align 32°C with 5,470 feet in the density altitude window
- Read the density altitude from the arrow: approximately 7,800 feet
Your aircraft will perform as if it’s taking off from 7,800 feet on a standard day. Check your POH performance charts at that density altitude.
The Wind Side: Wind Correction and Groundspeed
The back of the E6B is a vector calculator. It solves the wind triangle, which describes how wind pushes you off course and changes your groundspeed.
You need three pieces of information before you start:
- True Course (TC): The direction you want to travel (from your plotter)
- True Airspeed (TAS): Your speed through the air (from the calculator side)
- Winds Aloft: Wind direction and speed (from a winds aloft forecast, e.g., FA or Aviationweather.gov)
The E6B gives you two outputs:
- Wind Correction Angle (WCA): How many degrees to crab into the wind
- Groundspeed (GS): Your actual speed over the ground
Wind Side Anatomy
- Rotating compass rose disc: The outer ring with degree markings
- Sliding card: A grid beneath the clear disc, with horizontal speed arcs and vertical lines
- True Index: The mark at the top (12 o’clock position)
- Center grommet: The hole in the center of the sliding card, represents the aircraft
Worked Example 8: Finding Wind Correction Angle and Groundspeed
Problem: You’re flying a true course of 085°. Your true airspeed is 125 knots. Winds aloft are from 150° at 25 knots. Find your wind correction angle and groundspeed.
Step 1 — Set the wind direction: Rotate the compass rose until 150° is at the True Index (top).
Step 2 — Mark the wind speed: Starting at the center grommet, count 25 knots up the center vertical line. Make a pencil dot at that point.
Step 3 — Set your true course: Rotate the compass rose until 085° is at the True Index.
Step 4 — Slide the card to your TAS: Slide the card (up or down) until the pencil dot sits on the 125-knot arc.
Step 5 — Read the results:
- The wind dot is 8° to the right of the center line → WCA = +8° (correct right)
- Read the groundspeed below the grommet on the center line: 138 knots
Step 6 — Find your magnetic heading:
- True Course: 085°
- Wind Correction: +8° (right correction, so add)
- True Heading: 093°
- Magnetic Variation: subtract east variation (assume 12°E here)
- Magnetic Heading: 081°
That’s the heading you dial into your DI (directional gyro).
Which Way Is the Correction?
This is the question that trips up most students:
- Wind dot right of center line → wind is from the right → crab right → add WCA to true course
- Wind dot left of center line → wind is from the left → crab left → subtract WCA from true course
A memory trick: the dot shows you which side the wind is pushing you toward, so you crab toward the dot.
Unit Conversions
The outer edge of the E6B calculator side has printed conversion scales for common unit conversions. No rotating required — just find the value on one scale and read across.
| Conversion | Location on E6B |
|---|---|
| Nautical miles ↔ Statute miles | Outer scales labeled “NAUT” and “STAT” |
| Nautical miles ↔ Kilometers | Scales labeled “NAUT” and “KM” |
| US Gallons ↔ Imperial gallons | Marked on the outer ring |
| US Gallons ↔ Liters | Marked on the outer ring |
| Fahrenheit ↔ Celsius | Small thermometer scale near the window |
Putting It All Together: A Complete Nav Log Example
Here’s how a full cross-country calculation flows with the E6B:
| Step | Tool | What You Calculate |
|---|---|---|
| 1 | Plotter | True course, distance |
| 2 | E6B calculator (window) | True airspeed from IAS + altitude + temp |
| 3 | E6B wind side | Wind correction angle, groundspeed |
| 4 | Apply variation | Magnetic heading |
| 5 | E6B calculator | Time en route (distance ÷ groundspeed) |
| 6 | E6B calculator | Fuel required (GPH × time) |
Repeat for each leg. Your nav log is now complete.
Choosing Your E6B
ASA E6-B Aluminum Flight Computer
The go-to choice for most student pilots. The aluminum construction holds up through training and beyond. Includes a wind component grid and all major conversion scales.
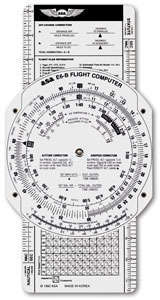
ASA E6-B Paper Flight Computer
A budget-friendly option made from heavyweight fiberboard. Performs every function of the aluminum version at a lower price point. Great for ground school or as a backup.
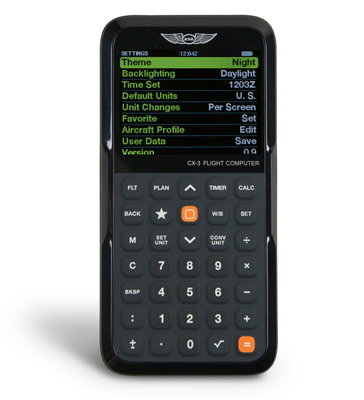
ASA CX-3 Pathfinder Electronic Flight Computer
Prefer digital? The CX-3 Pathfinder is FAA test-approved and handles all standard E6B calculations plus weight and balance, flight planning, and more. Allowed on the written exam.
Browse the full selection of E6B flight computers at MyPilotStore.
Tips for Getting Comfortable with the E6B
- Work examples from your ground school book. Most private pilot textbooks include practice problems with answer keys. Work ten or fifteen of these and you’ll be comfortable with every function.
- Keep a pencil handy for the wind side. You’ll be making and erasing wind dots for every leg. A mechanical pencil works well — the dots need to be small and precise.
- Don’t memorize steps, understand the logic. The calculator side is always: set a rate at the speed index, find a quantity on one ring, read the other. That’s it.
- Sanity-check every answer. If you get a groundspeed of 50 knots when you’re flying a 150-knot airplane with a 20-knot tailwind, something went wrong. Common sense is your best error-check.
- Practice the wind side until it’s automatic. The four-step process (set wind direction, mark wind speed, set true course, slide to TAS) needs to be muscle memory before your checkride.
The E6B on Your Written Exam and Checkride
The FAA knowledge test includes multiple questions that require E6B calculations — specifically around time en route, fuel burn, TAS, and wind correction. The test is open to approved calculators, including electronic E6Bs like the CX-3.
On the checkride, your examiner will watch you work through a cross-country nav log. They want to see that you understand the process, not just that you got the right number. Walk through your steps out loud. If you make an arithmetic mistake, the examiner isn’t likely to fail you for it — but they will want to see that your process is sound.
The E6B is one of those tools that rewards time invested. Put in the practice now, and it becomes second nature by the time you’re sitting across from your examiner.